![]()
Antarctica By Asetek
Reviewed by
[LN]Synthohol
Watercooling your PC is almost as mainstream as FireWire nowadays.
With so many manufacturers offering their share of watercooling solutions
its difficult to choose the right one for your system.
Today we will be putting Asetek's Waterchill Antarctica to the test.
Asetek is well known in the overclocking/watercooling community best for it's Vapochill
phase-change products, but those are expensive, and in order to increase their popularity,
the Waterchill series of products were created and are available without breaking your wallet.
Pictured here are the main components that we will be reviewing today.
The yellow box highlights the bag with a vial of Anti-Algae fluid that spilled all over the hardware during shipping
and that it took a while to wash off the hardware and ruined all the nice stickers that came with the kit.
![]()
![]()

CPU Water block
 GPU Water block
 Northbridge Water block

The CPU block was packaged like the rest in a Ziploc bag with a vinyl sticker covering the mounting surface of the block

The other blocks sport the same protection.
The radiator supplied with the kit is none other than a Black
Ice Pro 120mm w/ Sunon fan.
It is Rated for 378KCal per hour (1501 BTU per hour) or 440W.
It features a two pass, four core flow increasing the amount of watts removed especially for cooling and overclocking! and a great painted finish

which leaves the reservoir and pump. The reservoir is a signature design from Asetek.

And the pump is a Hydor L20 700L/hr (or 185 gallon/hr)

All fittings feature the push&lock self clamping type.
Which brings us to the test bed.
the patient today will be:
Abit NF7-s V 2.0
AMD Barton 2600+ Mobile CPU
PNY Ti-4200 Video Card
2x256MbCorsair 3200 XMS Platinum Low Latency in Dual Channel mode
2x160Gb WD SATA drives in RAID0
Antec True-Blue 480W PSU

This power plant is housed in a mid ATX case [LN]Farabomb found for me in the garbage.


My Zalman6000 got quite dusty over 4 months of gaming and folding, the box looks naked now and alone waiting patiently for its symbiot to return home.
First step is I am going to install the GPU block, this is stock...

Ready with parts I removed the simple stock fan, cleaned off the paste and got ready!

I purchased cheap memory heatsinks at a local CompUSA for the memory since i had it out of the case, I figured why not!:)
So with the sheath still on the GPU block, I dry fit to check for problems, the block is supposed to fit most G-Force and other cards but I only trust my own eyes and I'm glad I looked, the block is hitting a capacitor!!!


But I am not the kind of person to let that bring me down, so after a few careful minutes with Mr. Grinder, I managed to shave down some of the plastic to now fit the card successfully!
So now all that's left is to paste up the chip and install the water block.
Installation was extremely simple 2 washers, 2 bolts, tighten down slowly and evenly and it was done in a matter of a few minutes (after grinding down the bottom of the boss.


I must apologize for the focus, the camera I used was not suited for close-ups.
O.K., now to prep the motherboard...

Just your everyday NF7-s V2.0 :)
Well I have news for you, I was never so disappointed in Abit when i popped off the stock Northbridge HSF! (twice! I'll explain later)
Could they spare any less thermal paste? Geeez!!
It's a wonder it cooled at all!

After cleaning off the old paste, I put a bead of the supplied paste on the chip.

Spread it around nicely


O.K., so i spread it on after mounting the posts, don't tell!
That leads me to my next small issue, the washers supplied with the CPU block
were (according to the manual) supposed to be
12 nylon washers the same size according to the enclosed instructions, but I
only received these...

Different sizes that were supposed to be all the same size. Here is a pic on the back of the board where i used the small washers on the screws first (except one) before sending them through the board.
 The reason I used one large washer on the back was this..
I needed the small one for the chip traffic on the front and
I didn't want any pressure on those teeny chips for problems later.
So where were we?
Oh yeah, the posts and screws for the CPU and the NB were very simple to install
following the individual poster type
instructions in a slew of languages, however, I was only interested in the
diagrams.
Mounting the NB block
 was a breeze.
I merely tightened the screws 1/4 of a turn each until the springs were almost
closed.
Which brings us to the CPU block.
So I grab my board and block and line up a dry fit...
OH NO!!

Now i have to snap off those pesky capacitors because they are in the way!!
After a few tugs, they came off and out of the way.

I'm just kidding, what, do you think I was serious??
A very nice feature about this kit is it came with different
tops for different boards and both AMD and Intel.
This other top looks more suited for my application

And to show you the Intel P4 top..

If you didn't notice, the center port features a slit orifice by design to help
cause turbulence
and focus the liquid over the CPU's core area.
So because I have to swap tops, we get a peek inside :)
Here is a close-up of the copper block.

Notice the ridge design to increase the surface area that is
most critical, right above the core.
The more surface area the water will touch, the more heat the water will absorb
to be cooled off by the radiator.
Installing the CPU water block was also quite simple, I applied 1/2 a BB size of
paste to the CPU core

I spread it around nice and thin but covering the core.
I did it the same way I did for the Zalman HSF and I think it turned out fine.
Here is the proof!

The CPU block went on pretty easy, I had to initially persuade the CPU block on
the posts because they
weren't perfectly aiming straight up after tightening down, near perfect but
1/8" off on two posts.
I installed the springs and nuts and tightened them down in a figure eight
pattern 1/4 turn at a time
until the nuts bottomed out. (they are supposed to!)

Alright, so far we have installed all three blocks and our
victim looks like so..

I didn't take a picture of mounting the fan to the radiator with the supplied
screws though
I will say they are a pain to screw in, so starting the screws in the holes
before mounting the fan
made this easier for fear of poking through the rad with the screwdriver.
"Edwina Back-in-bowl"
. (Taken from a movie I cant remember the name of)
Back in the box it goes.

After considering placement of the components I cut and fit the very nice and flexible tubing to best fit the small case.


Please take notice of the tight bend between the GPU and the NB blocks, the tubing didn't even kink!
A little leak test...

Asetek even included a small green insulated wire to jumper the ATX connector.

The final component is the fan controller.

It requires a floppy drive power connector and features the fan header and a
jumper to select fan voltage, 7v or 12v.
there is also a 2 pin LED header to compliment your featured lights in front of
your case (you supply the LED though)
Here is the relay opened up...

Once power is applied to the relay via the PC's power switch, the fan and pump
start up.
I am going to take a moment to explain my comment earlier
about mounting the Northbridge block twice.
The majority of my hobby is done at night when my kids are asleep so that I am
usually not disturbed or distracted.
Unfortunately, an open case is like a playground to my three year old son, he
likes to help daddy so he figured it
would be a good thing if he poked around the motherboard with a Phillips head
screwdriver while I was not looking and broke
one of the resisters on the motherboard, so when I powered it up there was a pop
and a dead board.
So, progress was delayed a few days while i waited for another board to be
delivered, this time I made sure
my PC was protected and found an even worse stock application of grease under
the NB fan.
So, off to the testing we go!!
The first step I took in all tests was to release all the Windows services i
could.

My CPU temp @ 11x200 under load was actually 66c before the addition
of the small 80mm fan
 to the left of the heat sink to help me
get it stable enough to copy this screenshot.
(now you know why I wanted to water-cool so bad!)
All tests were performed with an ambient room temp of 21c-23c (70F-74F)
system temp reported via MBM5 30c-31c (86F-88F)
When everything was brand new, it idled around 46c but the dust that accumulated
I suppose
caused the decline of its full cooling power.
Since this review is not directly comparing components, but rather offering an
account of the positive difference between
water and air cooling in a real life typical scenario.
With that said, lets move on...
The Beast Within & Truth Be Told.
The first thing I need to do here before we move on, is to
confess the fact that all benchmarks UNDER 220fsb
were performed with the stock D26 bios from ABIT.
Even after the change to watercooling regardless of voltage supplied to core,
memory or NB, I was unable to achieve
any signs of stability or the ability to use preferred memory timings.
All benchmarks 220fsb and under were done with 13,3,3,2 timings, which after
long tedious time consuming tests
were found to give the best stable results.
All benchmarks OVER 220fsb were performed after a BIOS flash
to
Tic-Tac's MantaRay XT CPC off BIOS, which did not change the temps but did
however
enable me to use the preferred 11,2,2,2 timings and gave me rock solid stability
up to 230fsb @ 1.85v
I will also add ALL tests were done with a CPU multiplier of 11.
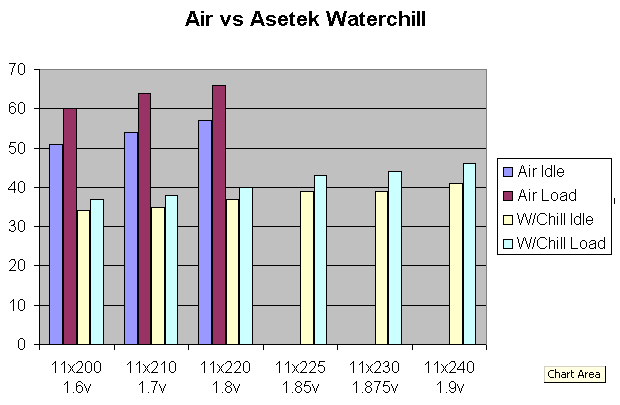
The main reason for watercooling this box was to bring my
temps down to a workable level and as
you can see by this chart created after hours and hours of testing, there was a
huge payoff for me.
Load temps were initiated with the use of Prime95 running for 2 hours prior to
collecting results.
This reviewer also notes that at 11x230fsb the PC completed running a complete
cycle of Prime95 without error, not just that silly 1 hour test in the beginning
when you run the application. The complete cycle finished in slightly over
30 hours straight.
Here are a couple screenshots of 11x240fsb.


And of course my SuperPI results

Excuses, Excuses...
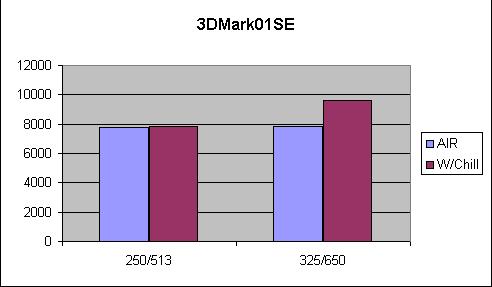
As far as any 3Dmark results, I was able to now over clock my
PNY Ti-4200 up to 325/650 from the stock 250/513
without any loss of frames or any sign of distortion whatsoever.
I am however slightly disappointed with the benchmarked
results as compared to the ASUS A7V266-E
the card was previously hosted in as the ASUS did not offer PCI/AGP lock like
the ABIT NF7-S does so
I lost about 3000 points from results in the A7V over clocked.
I didn't have the guts to change the AGP frequency because I did not want to
take any chances
of blowing up my gaming video card. When I upgrade to a better card I will play
around with it and modify this review.
While overclocking the video card, all temps load and idle only increased by 1c
at most.
This is the end?
Again I want to remind the readers that this review was performed to provide
a step by step account of installation and to
document the radical temperature difference watercooling can provide your
system.
In conclusion, this reviewer found the Asetek Waterchill
Antarctica kit to be not only a fantastic cooling solution
but its ease of installation, excellent tubing, quality of components and super
quiet operation make it
a most superb compliment to any PC enthusiast from novice to the most
experienced.
I really enjoyed assembling the kit, and found even though it
was adapted into a small three bay mid-tower case, all
the components and tubing fit without cramping, kinking or leaking!
This reviewer would like to extend a very special thanks to
the folks at Asetek for not only supplying the
Waterchill Antarctica to me for review, but for engineering a fine quality
product that now allows me to push my
computer to limits I never dreamed I could reach.
Thank you Asetek!!!
I also wish to thank [LN]Player0 for selecting me to perform this review for
LiquidNinjas.com
PROS
Excellently crafted and polished parts.
Clear individual instruction
sheets provided for each component.
Very nice kink-free clear tubing.
Simple installation of posts and fasteners.
Push & lock tubing connectors.
Smooth lapped block surfaces.
Multiple CPU block tops.
Allen wrenches provided to
facilitate top changes.
Black Ice Pro radiator.
7v and 12v choice on fan relay.
Ultra quiet Hydor pump.
CONS
Not enough large nylon washers.
Anti-Algae additive bottle leaked
during shipping making a mess in
the bags of hardware.
VGA block too thick and interfered
with capacitors on GEForce4 card and had to
shave off some plastic to fit.
Reservoir too tall to fit if other PCI cards
are used in small case. A bay res would have
been better in my application.
Wrong size "Y" fitting supplied.
Rating 8/10
Reviewer Steve Bach [LN]Synthohol